Do you need to splice together some audio or low voltage contacts or are you debating which connector to get on the back of your new patchbay? Between the easy to manage 2” standard stripped length and the true cross-sectional area maximization, the E3 pins are the superior mating connector. Besides the superior electrical connection provided by the cross, the E3-pins also provide a very robust physical connection to the wire itself, providing both a primary and secondary crimp sequence. Today we’ll talk about how to prep your cable for E3 pin connectors and provide some resources for your next project.
If you are a fan of Bittree’s patchbays, you’re familiar with the E3 pins connection as it’s their standard. If you’ve used some other brand of patchbays in the last 10 or 20 years then you might not have run across this type of termination. Fortunately, they are very easy to use and provide a solid connection ideal for two conductors shielded cable commonly used in recording studios.
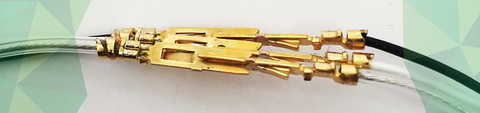
The first thing you want to do when you’re prepping your cable is to strip and confirm the gauge of the drain wire and obtain the proper size of noodles as I like to call them- the pre-cut Teflon tubes. You also want to make sure you have some 1/8” or 3/16” shrink wrap to cover the split. After you’ve stripped your cable back 2 1/8” and you’ve slid the Teflon over the drain wire, make sure it’s seated and heat-shrink the shrink wrap evenly over the insulation and the insulated pair. Now cut all 3 conductors even and strip each one back 1/8”. Your bare wire should end up squarely under the dual crimp contact and the strain relief should wrap around about another 1/8” of the Teflon. See the photo below for a perfect example.
As with any termination, you always want to give a bit of a stress test to each of the pins you crimp. A slight tug ensures that the pin is physically secure. Once this is done on each pin and you’ve done a quality control check, only then should you insert the pins into their designation on the connector. If each pin is crimped perfectly and at the same length, there will not be more stress on one pin than another and the conductors will appear even when stretched out straight. When inserted into the mating connector, they should remain straight and at the same apparent length as well. After all of the physical connections are tested and a quality control check is done, now they can be inserted into the mating connector.
Now that the pins have been put into the mating connector, it’s always a good idea to electrically test your connections from pin to pin to insure the pinout is proper and that you’ve got solid continuity on each conductor. Any multimeter with a continuity setting will do. Use a reference drawing of your mating connector when using E90’s if you need to keep track of each test. Once you’ve tested everything, go ahead and make the audio connections everything should be good to go!
E3 pins are still today’s de facto standard crimp style mating audio pin. Whenever I see a picture of them I appreciate the genius in their design again. An E3 pin or E90 connector properly mated will guarantee a make a solid connection.
Subscribe to our newsletter and always be the first to hear about what is happening.
© 2026 Bittree